Introduction
The traffic generator test is a great tool to as the name says generate traffic between devices, on the helpdesk we use this for stress testing devices as well as making sure interfaces are able to push through the correct speeds.
The main situations where we use this is when we have a CCR style of device that we have not been able to replicate the reported error or if we have been able to fix a hardware issue and want to confirm it does not come back, another example of when we use this tool is when we get the 180-t modules and want to confirm that it is able to push the 100/100mbps as well as make sure the connection is stable with no dropouts.
Getting started
The first thing we will need to do is get 2 routers and the DUT(device under test), what we are aiming to do is have a router either side of the DUT that is going to be generating or receiving the traffic so the DUT only has to forward this traffic. Depending on what type of throughput the interface/s the DUT has on it will decide if you can use a SOHO router like a hap ac2 or have to use a CCR.
As well as getting the devices we will need some cables, the idea with the traffic gen test is to get traffic going through all the port or if there is an even number of ports as many as possible.
All we need to do with the ports is have an ingress port and an egress port, all the other ports will then be linked together with an ethernet cable, this allows us to bridge 2 of the ports together in their own bridge linking the 2 physical connections together.
You can find an image below of this, please note that each bridge is a separate bridge.
Configuration
First off you will need to put an IP address on the interface going from the router to the DUT on both ends, does not matter what this is as we just need basic layer 3 connectivity. I would suggest trying to ping from one router to the other to make sure that the DUT has been connected up correctly before moving forward.
Traffic Generator
To set this up we will need to go to one of the routers, I prefer to configure this on the closest router but either side should be fine.
Once you have logged into the router please go to the tools>traffic gen menu
From here we need to configure 3 main things, the port, the packet template and the streams
The first thing we are going to do is configure the port, this one is simple as all we need to do is set the port to the interface that is going to the DUT
After this is configured you will need to then configure the packet template, in here you will need to add 3 header stacks and in this order, mac, ip then upd. If you do not follow this order the template will throw an error saying the X cannot be placed before Y. Once you have done this you can set the port, this is not mandatory but I have found that if you do not do this it can create errors in the future after playing around with the test.
Once you have filled out the general page we will need to go to the IP tab, in there we will fill out the destination and gateway addresses, you will need to set the destination address to the IP of the router that you are configuring the traffic generator on then set the gateway address as the one that is on the other router
Once this is done and has been applied all we need to do now is configure the stream, in here it is simple just select the port and the packet sice and it should be good to go:
to run the test all you will need to do is click the quick start button, from here you can edit some of the parameters of the test directly so that I why I suggest using it over just pressing the start button. The usual settings you would set here is the packet template that we just made as well as what the speed of the test will be
Stress testing the CPU
To stress test the CPU on larger devices like CCRs we will need to do some packet processing as just pushing through the max speed will not cause all their cores to reach 100%. To do this we use IP>firewall>mangle to mark each packet with a packet mark of 1 then the next rule will check the same traffic and see if it has a packet mark 1 then it will mark it with a packet mark of 2 and so on.
Once logged into the DUT the first thing that needs to be done is to go to the bridge menu and edit the settings so the bridge will use the IP>firewall>filters
Once this is done you will need to import the following command, this will go through and add 100 mangle rules that will check for a number, increment it by one then check for that number again and so on.
:global i 0
:while ($i<100) do={
/ip firewall mangle add action=mark-packet chain=prerouting new-packet-mark=($i+1) packet-mark=$i passthrough=yes
:set i ($i+1)
}
Once the rule have been imported please go to the first mange rule and under the general tab and click the up arrow on the packet mark, as there will be no packet mark of 0 coming through we will need to remove that filter so we start the chain of mangle.
Once this has been applied your CCR should be using 100% off all cores, you are able to see this by going to the tools>profile menu.
Conclusion
We usually run these tests for 48 hours and if it is a CCR or another device that we will stress test the CPU we will test it for the bandwidth test for 1 day then 2 days with the mangle rules.
The main thing to look at when analysing the tests is the statistics on the traffic generator as well as the interface statistics on the DUT. We want to make sure there are no link down reports on the interfaces as well as the TX and RX packets are roughly the same.
We need to check the interface stats and compare them with the traffic gen as well. Make sure they are roughly the same as well as make sure there are no errors on the interface stats.
We need to check the interface stats and compare them with the traffic gen as well. Make sure they are roughly the same as well as make sure there are no errors on the interface stats.
For the traffic generator stats there will be some dropped packets, as long as it is not a high amount compared to how much was sent out that should be ok.
Last thing to look at is the logs to make sure there is no errors reported as well as the system health and resources to make sure everything is still in the expected levels.
checking/interpreting test results
check Device Generating Traffic (DGT)
check TOT (final row of traffic gen stats). Check highlighted fields especially. Some loss is expected. Can improve with multiple streams. Can use intuition to gauge results. Either way, if results are suspect, look for explanations in other following results.
In this case the device was fine, just a broken clip on the ethernet cable cause it to fall out a few times. You can see the times in the log of the DUT. They would match office hours.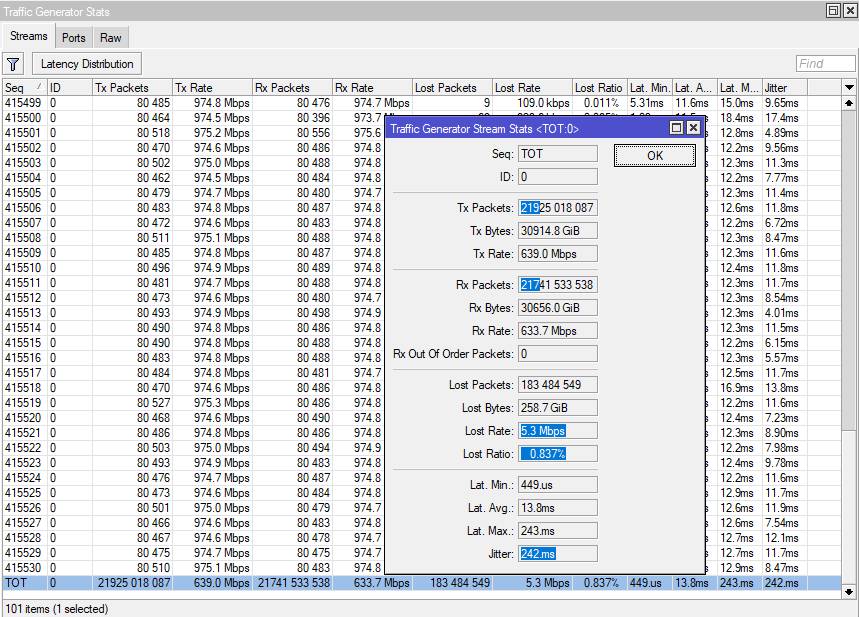
DGT>Tools>Traffic Generator>Stats , Double Click final row "TOT"
In this case the device was fine, just a broken clip on the ethernet cable cause it to fall out a few times. You can see the times in the log of the DUT. They would match office hours.
DGT>Tools>Traffic Generator>Stats , Double Click final row "TOT"
check DUT
N.B. you can add columns such as 'Tx Errors', 'Tx Drops'DUT>Interfaces
For each physical interface (eg sfp1), check Rx stats, Tx stats. Expected results are zero in non red-circled fields.
DUT>Interfaces>sfp1
DUT>Log
DUT>System>Resources